
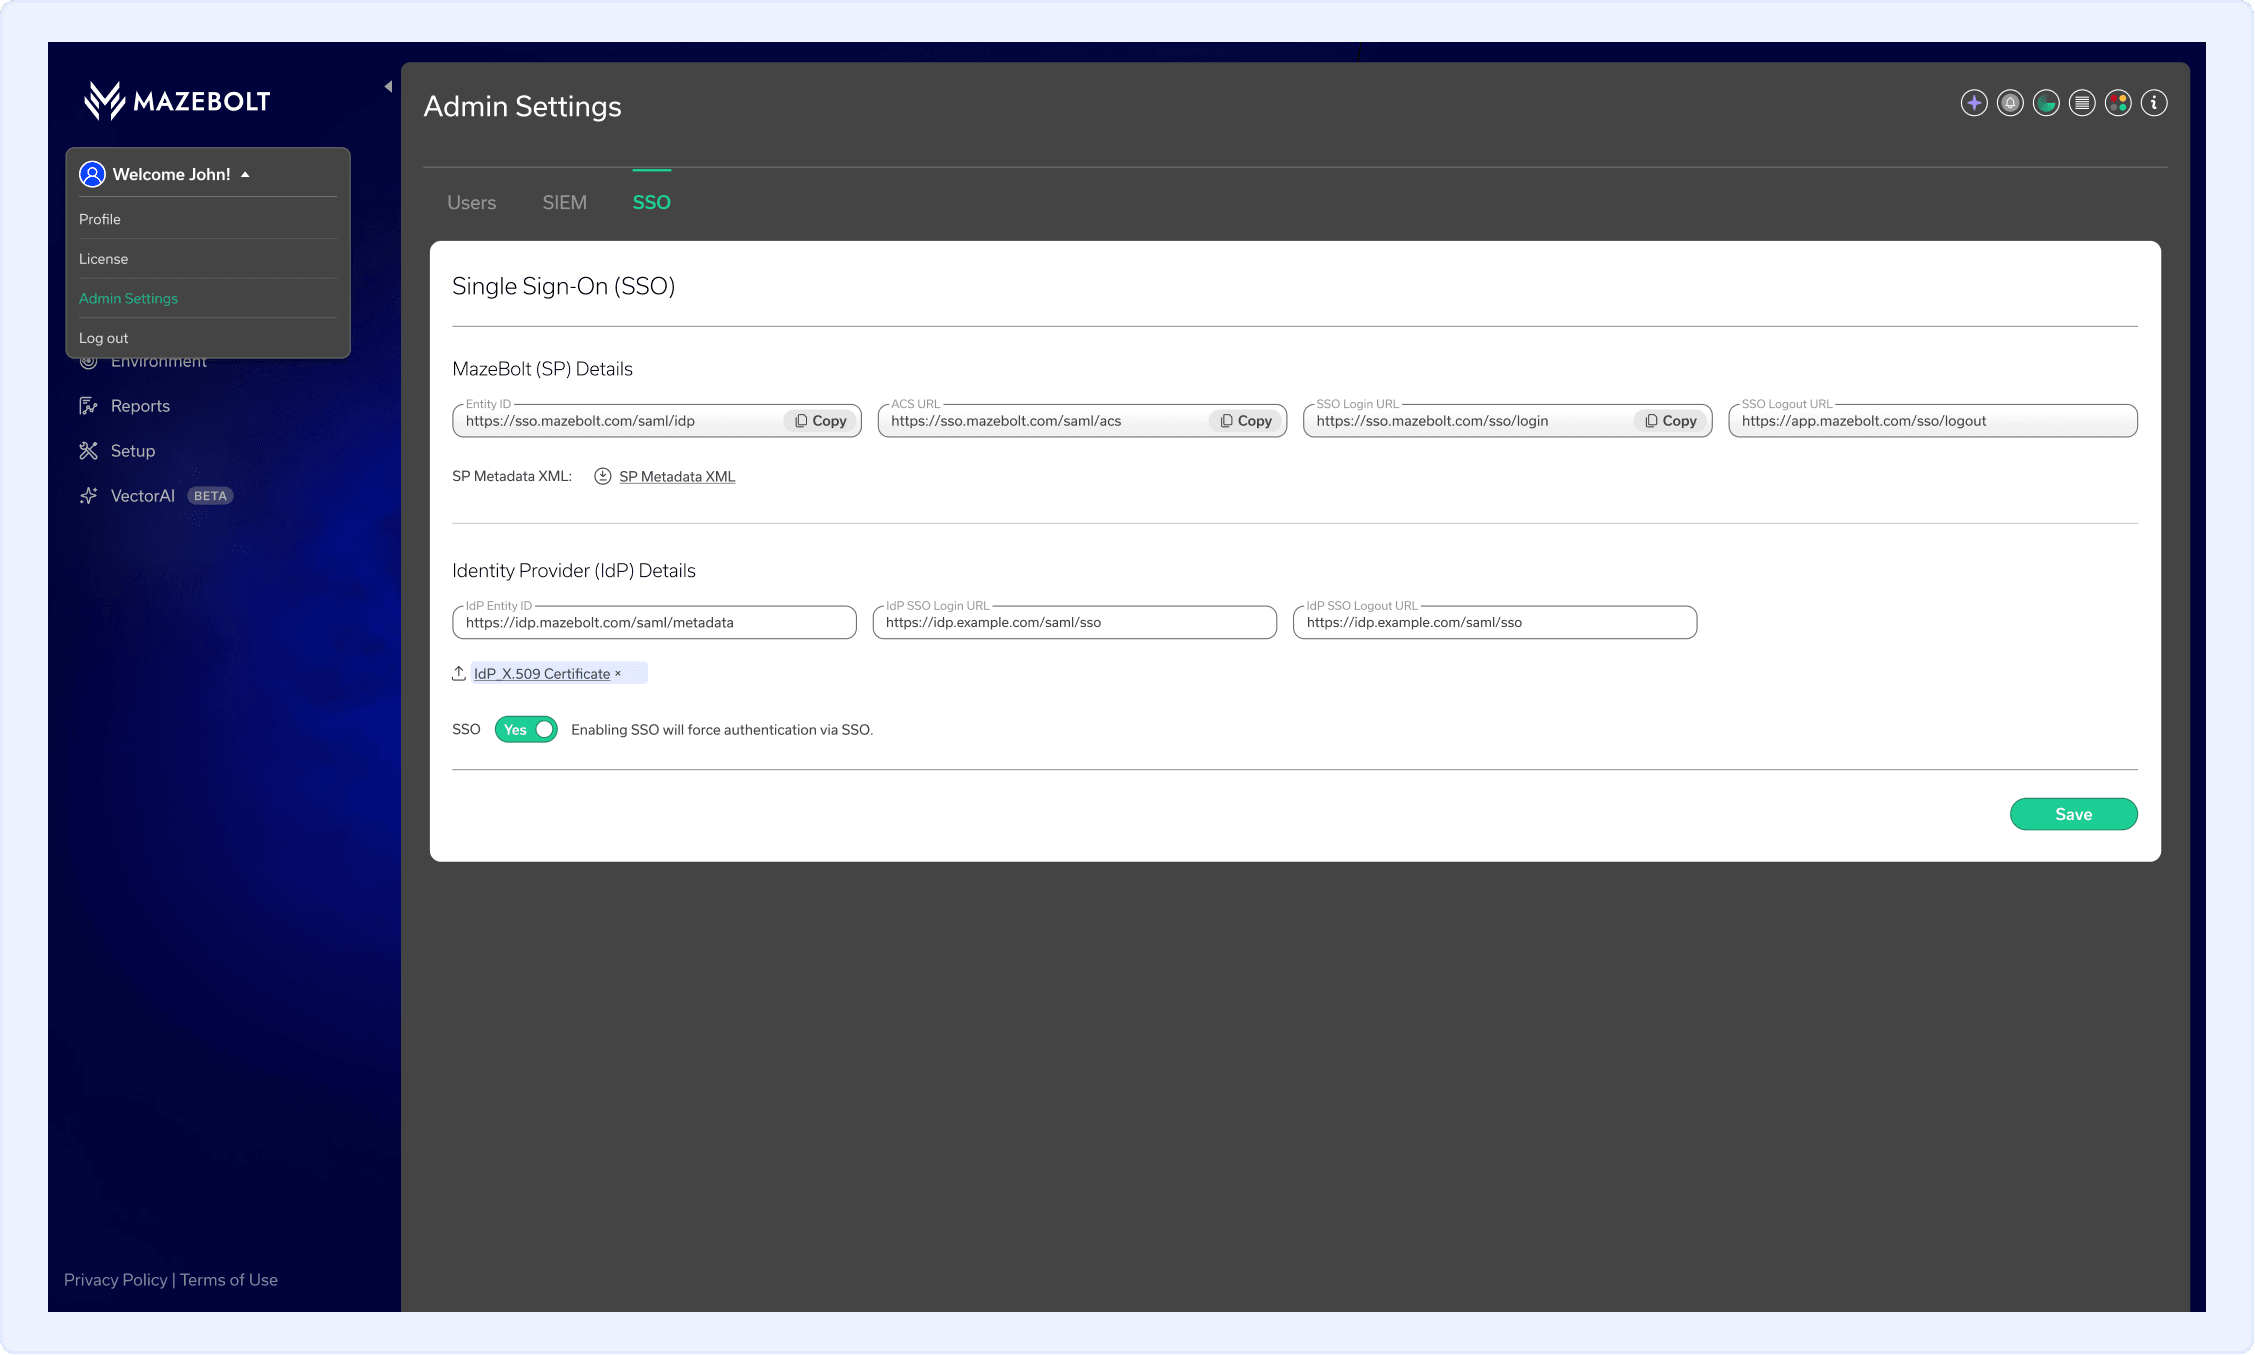
What is SSO?
Single Sign-On (SSO) allows users to log in to RADAR using the organization's existing IdP (identity provider) - such as Microsoft Entra ID or Okta - instead of a separate RADAR username and password. Once SSO is enabled, users authenticate through the IdP, and RADAR grants access automatically without a second login.
SSO helps organizations streamline user access, strengthen authentication governance, and align RADAR login workflows with existing enterprise identity policies.
Note
Required Role: SSO configuration is available only to users with Admin role.
What You'll Learn on This Page
On this page, you'll learn how SSO works in RADAR and how to configure it for organizations using Microsoft Entra ID, Okta, or another SAML 2.0-compliant identity provider.
Navigate to Your SSO Identity Provider
- Setting Up RADAR with a Custom SSO Identity Provider
- Setting Up RADAR with Microsoft Entra ID SSO
- Setting Up RADAR with Okta SSO
Key Terms
- Identity Provider (IdP) – The system that authenticates users and verifies their identity before granting access to RADAR such as Microsoft Entra ID, Okta, etc.
- Service Provider (SP) – The application that relies on the Identity Provider for user authentication. In this case, RADAR acts as the Service Provider.
- SAML (Security Assertion Markup Language) – An industry-standard protocol used to exchange authentication and authorization information between an Identity Provider and a Service Provider.
- SP Entity ID – A unique identifier assigned to RADAR within the SAML configuration.
- IdP Entity ID – A unique identifier assigned to the organization's Identity Provider.
- Assertion Consumer Service (ACS) URL – The RADAR endpoint that receives and processes authentication responses from the Identity Provider.
- SSO Login URL – The Identity Provider endpoint that processes authentication requests initiated by RADAR.
- Single Logout (SLO) URL – An optional endpoint used to support logout requests between RADAR and the Identity Provider.
- X.509 Certificate – A digital certificate used to validate SAML authentication responses and establish trust between RADAR and the Identity Provider.
- XML Metadata File – A configuration file that contains SAML settings, including URLs, identifiers, and certificates, to simplify the SSO setup process.
- Attribute Statements – User attributes included in the SAML response, such as email address, first name, or last name. These values are used by RADAR during authentication and are case-sensitive.
Setting Up RADAR with a Custom SSO Identity Provider
Obtain RADAR SSO Details
Use the following steps to configure Single Sign-On (SSO) when using an Identity Provider (IdP) other than Microsoft Entra ID or Okta:
- In the top-left corner of the screen, click your User icon and select Admin Settings.
- Open the SSO tab.
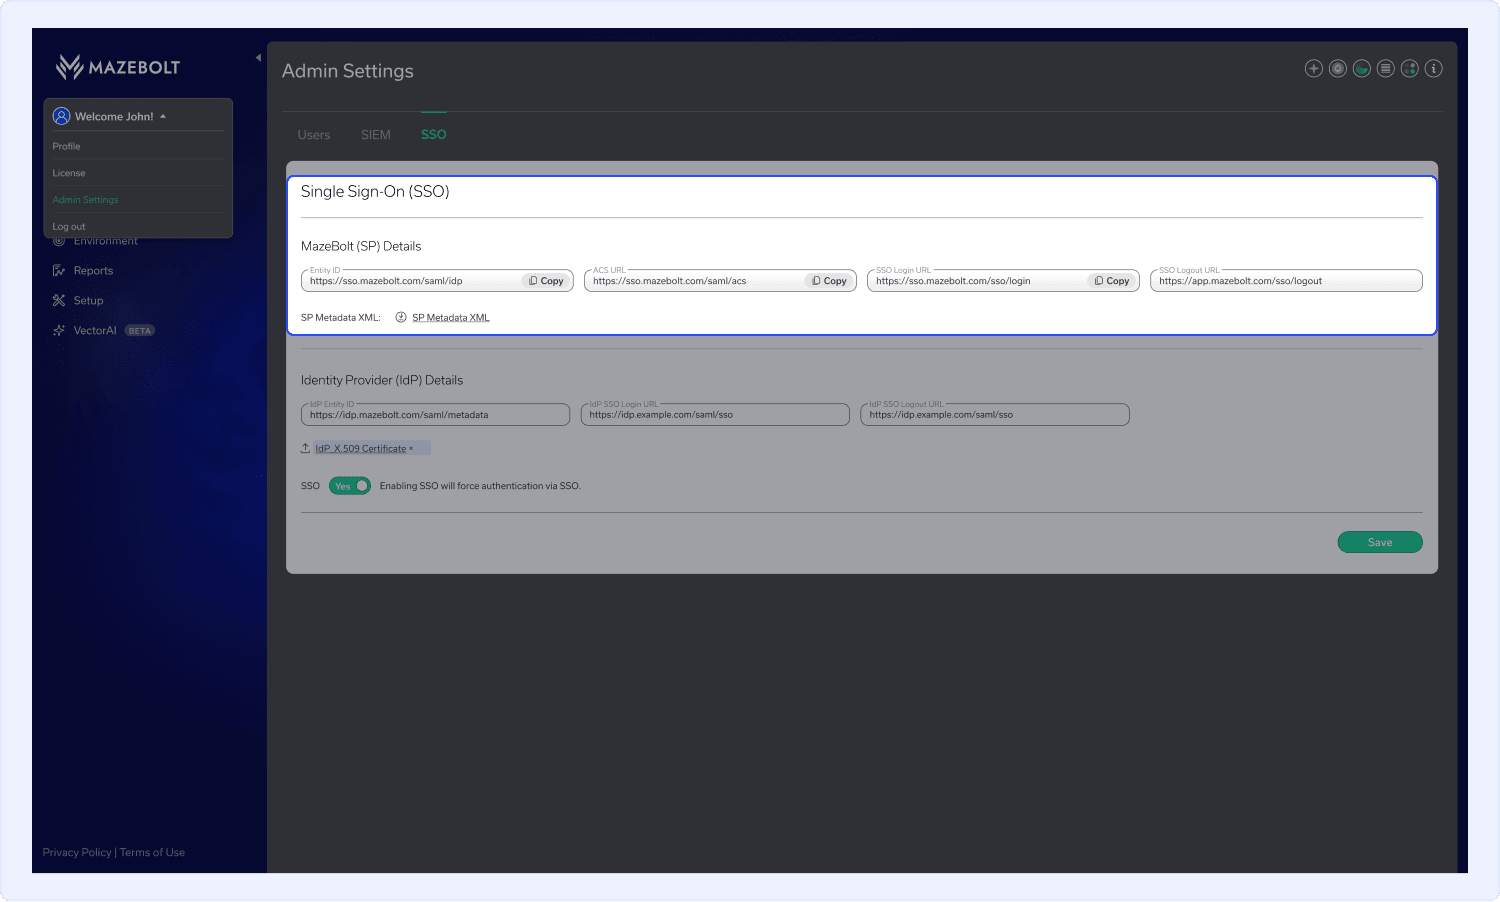
- Obtain the MazeBolt (SP) details using one of the following methods:
- Copy:
- Entity ID
- ACS URL
- SSO Login URL
- SSO Logout URL (optional)
- Download the SP Metadata XML file.
- Copy:
4. Use the MazeBolt (SP) details or SP Metadata file to set up the Identity Provider application.
Setting Up Custom Identity Provider in RADAR
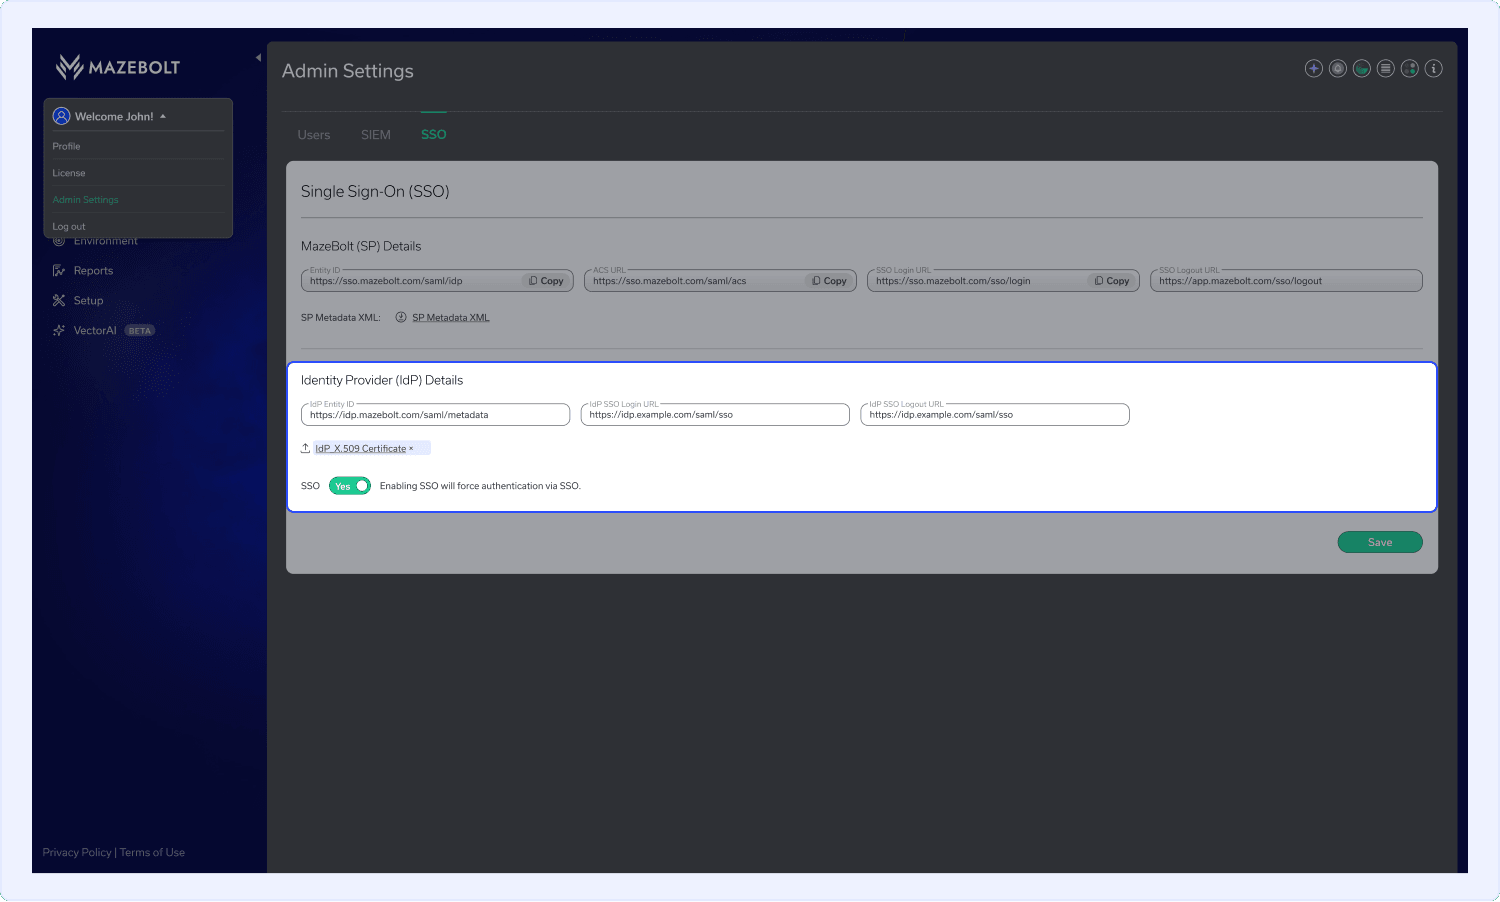
After setting up the Identity Provider application with MazeBolt (SP) details, enter the Identity Provider details in RADAR.
Obtain the following details from the Identity Provider (IdP) application:
- IdP Entity ID – Paste the Identity Provider Identifier.
- IdP SSO Login URL – Paste the Identity Provider Login URL.
- IdP SSO Logout URL (optional) – Paste the Logout URL, if configured.
- Identity Provider signing certificate.
Return to the SSO tab in RADAR and enter the obtained details above from the Identity Provider application.
- Add the IdP details obtained into RADAR under Identity Provider (IdP) Details.
- Upload the Signing Certificate downloaded from the Identity Provider application.
- Enable SSO Configuration.
- Click Save.
Verify the configuration by signing in through the Identity Provider configuration application.
Once the configuration is verified, users can authenticate to RADAR using the configured Identity Provider.
Setting Up RADAR with Microsoft Entra ID SSO
Obtain RADAR SSO Details
These instructions guide internal staff users on configuring Microsoft Entra ID (Azure AD) using the Azure AD SAML Toolkit for SAML 2.0 SSO in RADAR. While these instructions focus on the Azure AD SAML Toolkit, some customers may use different tools or variations within Azure AD. In such cases, the steps and naming conventions may differ slightly, but the overall configuration concept remains the same.
Use the following steps to configure Single Sign-On (SSO) when using Microsoft Entra ID as the Identity Provider (IdP):
- In the top-left corner of the screen, click your User icon and select Admin Settings.
- Open the SSO tab.
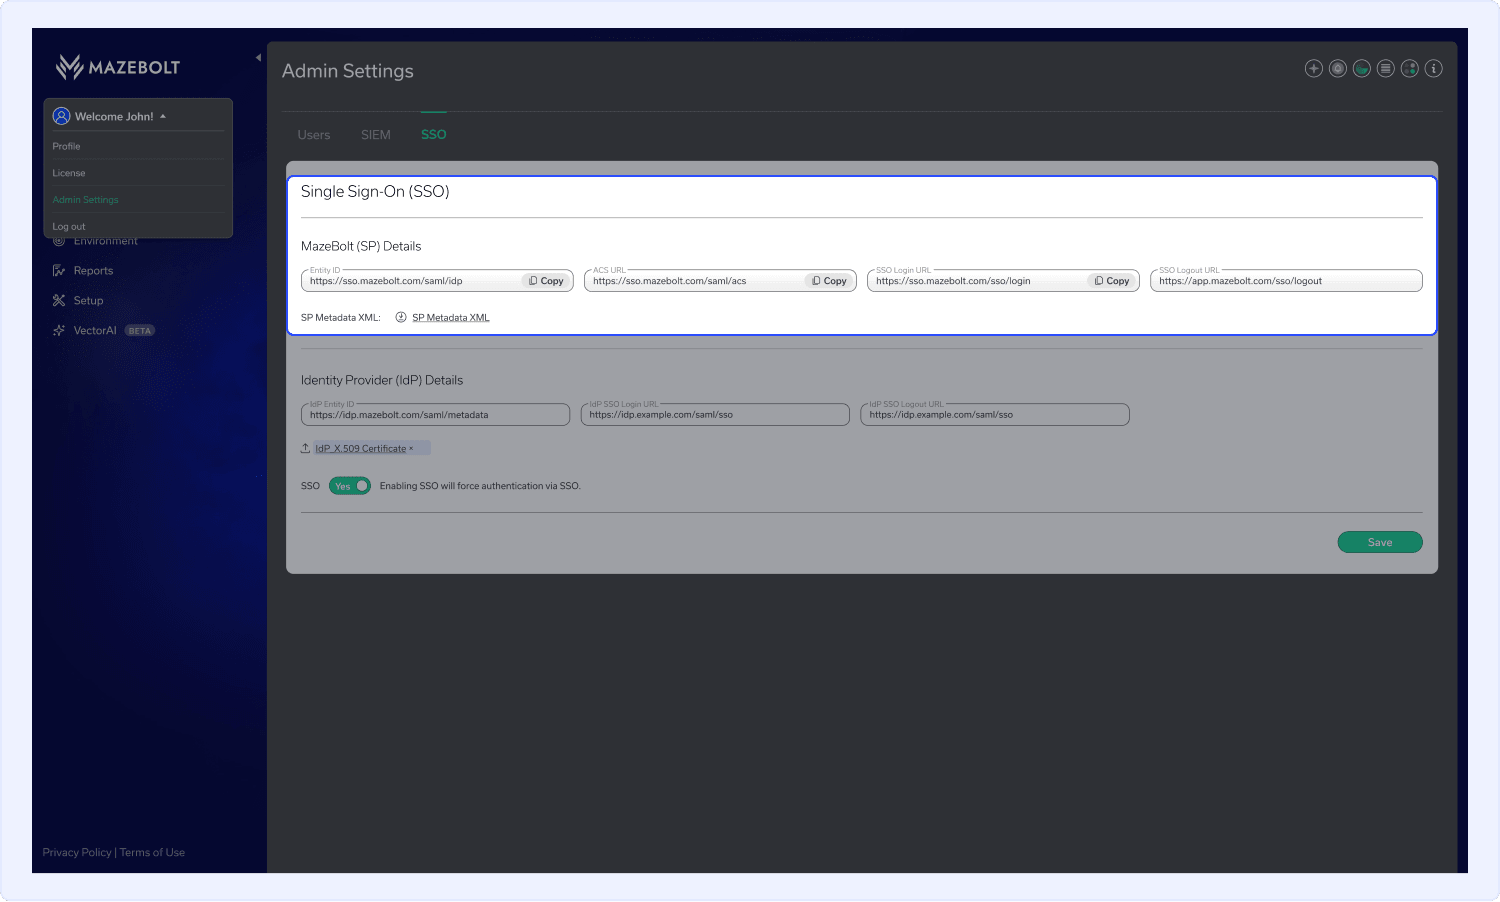
- Obtain SP Details:
- Copy the following details:
- Entity ID
- ACS URL
- SSO Login URL
- SSO Logout URL (optional)
- Download the SP Metadata XML file.
- Copy the following details:
4. Use the MazeBolt details or SP Metadata file to set up the Identity Provider application.
Setting Up RADAR in Microsoft Entra ID
Note
The Microsoft Entra ID interface may vary depending on your tenant configuration and Microsoft updates. The configuration process remains generally the same.
After setting up the Identity Provider application with MazeBolt (SP) details, enter the Identity Provider details in RADAR.
- Sign in to the Microsoft Entra ID portal with administrative privileges.
- Navigate to Enterprise Applications.
- Open Azure AD SAML Toolkit.
- Under Users and Groups, assign the users or groups that require access to RADAR.
- Under Single Sign-On, select SAML as the authentication method.
- Under Basic SAML Configuration, select Edit and enter the RADAR Service Provider (SP) details:
- Identifier (Entity ID)
- Reply URL (ACS URL)
- Sign On URL (SSO Login URK)
- SSO Logout URL (optional)
- Save the configuration.
- Under Attributes & Claims, configure the following attribute:
- mail → user.mail
- Save the changes.
Important
The value sent in the mail attribute must match the username configured for the user in RADAR. Attribute names and values are case-sensitive.
Setting Up Microsoft Entra ID in RADAR
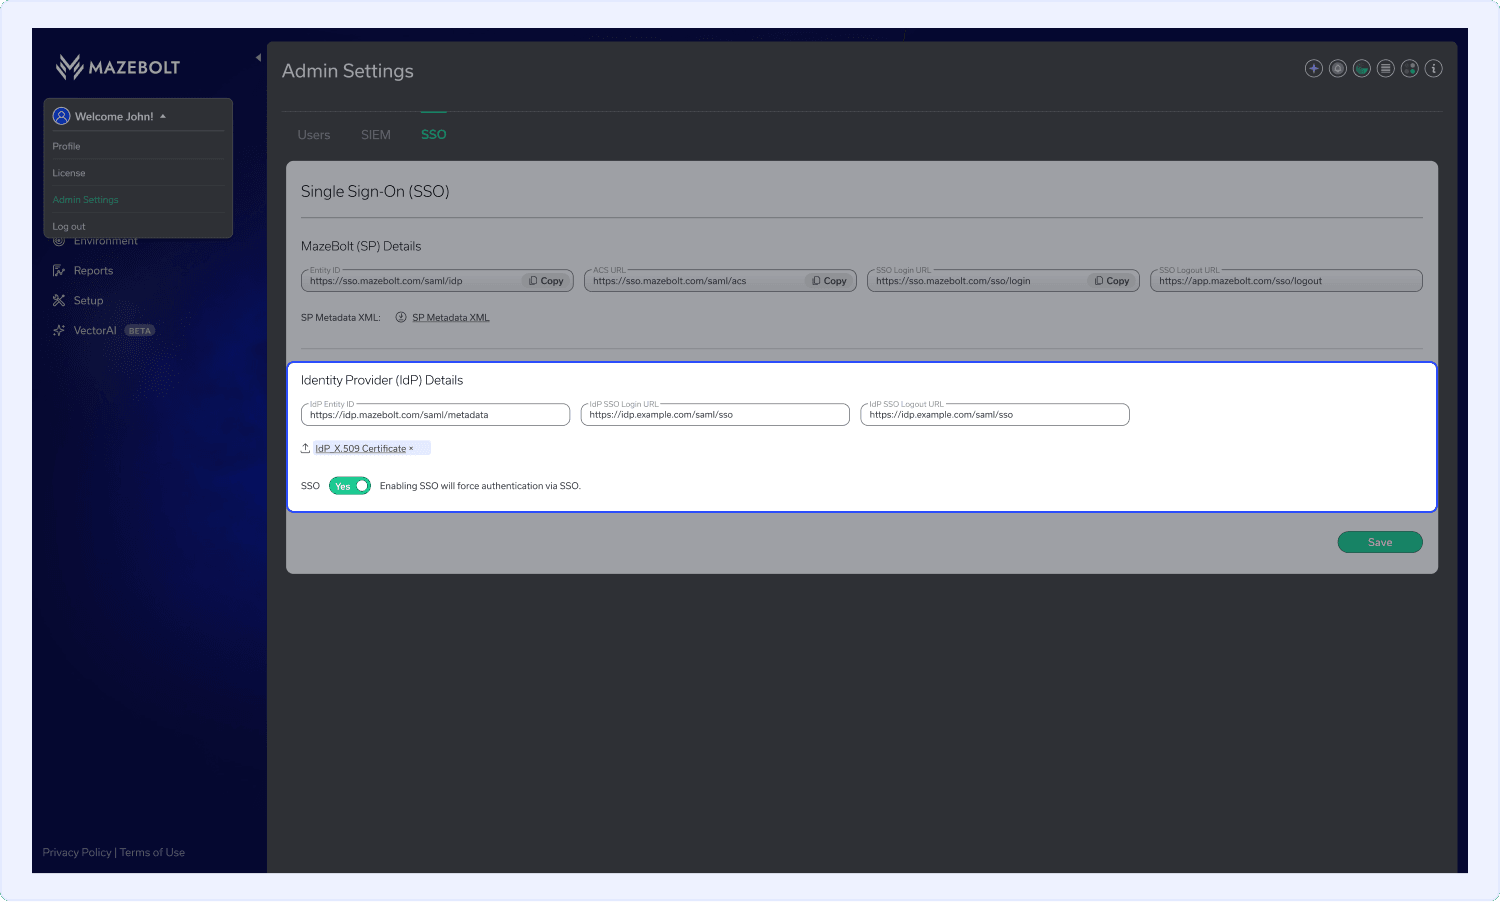
After completing the Microsoft Entra ID configuration, return to the SSO tab in RADAR and enter the obtained details above from Microsoft Entra ID application:
- IdP Entity ID – Paste the Microsoft Entra ID Identifier.
- IdP SSO Login URL – Paste the Microsoft Entra ID Login URL.
- IdP SSO Logout URL (optional) – Paste the Logout URL, if configured.
- Upload the Signing Certificate downloaded from Microsoft Entra ID.
- Enable SSO Configuration.
- Click Save.
5. Verify the configuration by signing in through Microsoft Entra ID.
Note
Monitor the expiration date of the Identity Provider certificate. When the certificate is renewed, upload the updated certificate to RADAR to maintain uninterrupted SSO authentication.
Setting Up RADAR with Okta SSO
Obtain RADAR SSO Details
The following steps describe how to configure Okta as the Identity Provider (IdP) for SAML 2.0 Single Sign-On (SSO) in RADAR.
Use the following steps to configure Single Sign-On (SSO) when using Okta as the Identity Provider (IdP):
- In the top-left corner of the screen, click your User icon and select Admin Settings.
- Open the SSO tab.
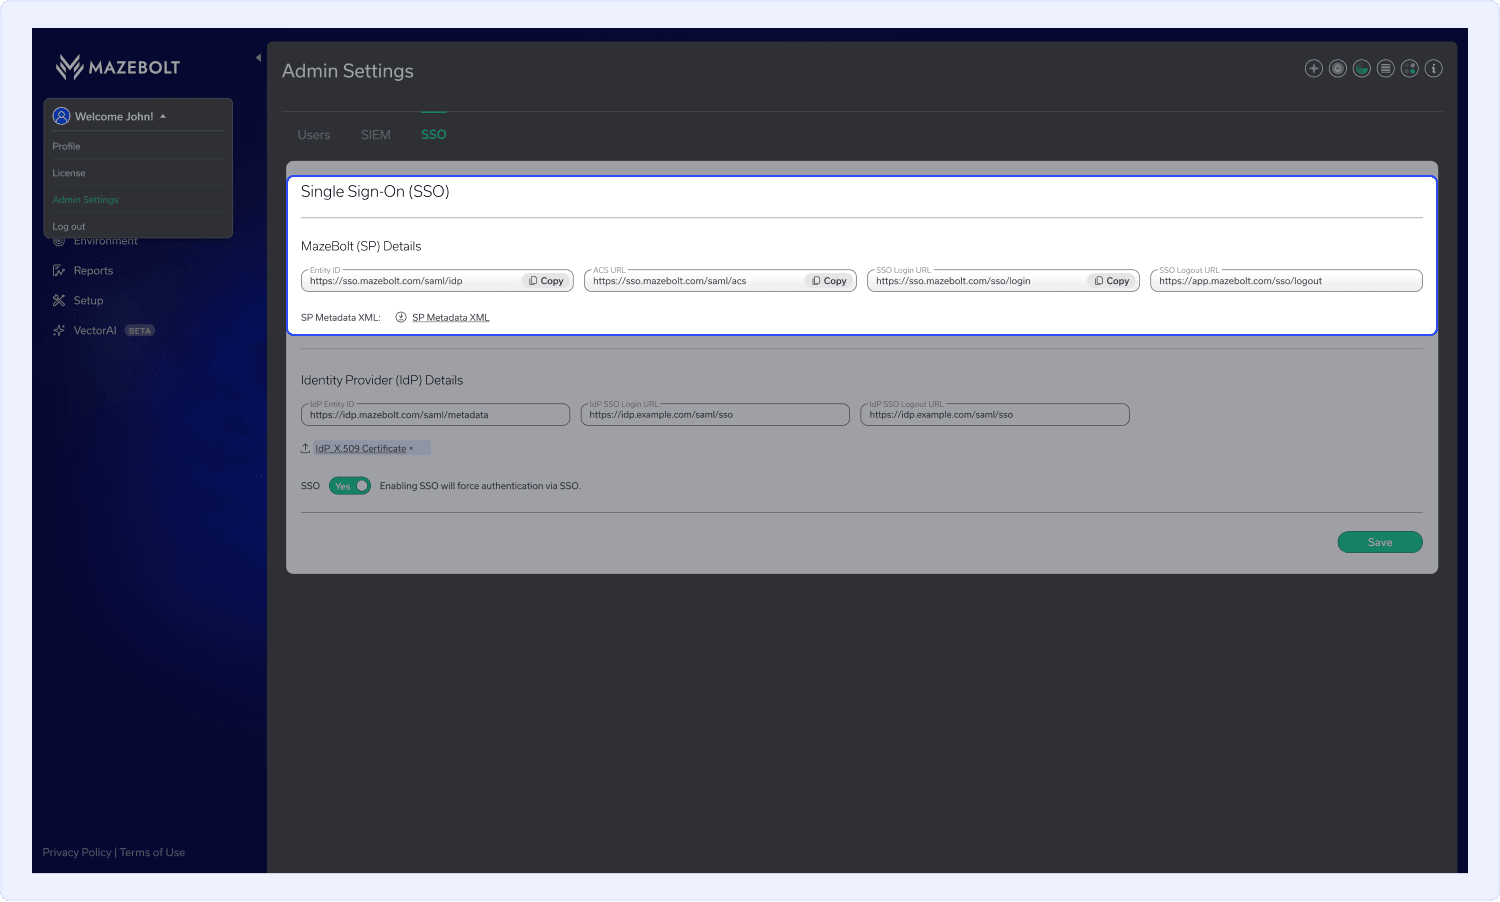
- Obtain SP Details:
- Copy the following details:
- Entity ID
- ACS URL
- SSO Login URL
- SSO Logout URL (optional)
- Download the SP Metadata XML file.
- Copy the following details:
Setting Up RADAR in Okta
- Sign in to your Okta organization using an administrator account.
- Navigate to Applications.
- Create a new application integration and select SAML 2.0 as the sign-on method.
- Enter an application name, such as RADAR SSO, and proceed to the SAML configuration settings.
- Configure the following RADAR Service Provider (SP) details:
- Audience URI (SP Entity ID) – Enter the RADAR Entity ID.
- Recipient URL – Enter the RADAR SSO Login URL.
- Destination URL – Enter the RADAR SSO Login URL.
- Single Sign-On URL – Enter the RADAR ACS URL.
- Configure the following SAML attribute:
- mail → user.email
- Assign the users or groups that require access to RADAR.
- Complete the application setup and save the configuration.
- Obtain the following Identity Provider (IdP) details from Okta:
- Issuer (IdP Entity ID)
- Sign-On URL (IdP SSO Login URL)
- Signing Certificate
Important
The value sent in the mail attribute must match the username configured for the user in RADAR. Attribute names and values are case-sensitive.
Setting Up Okta in RADAR
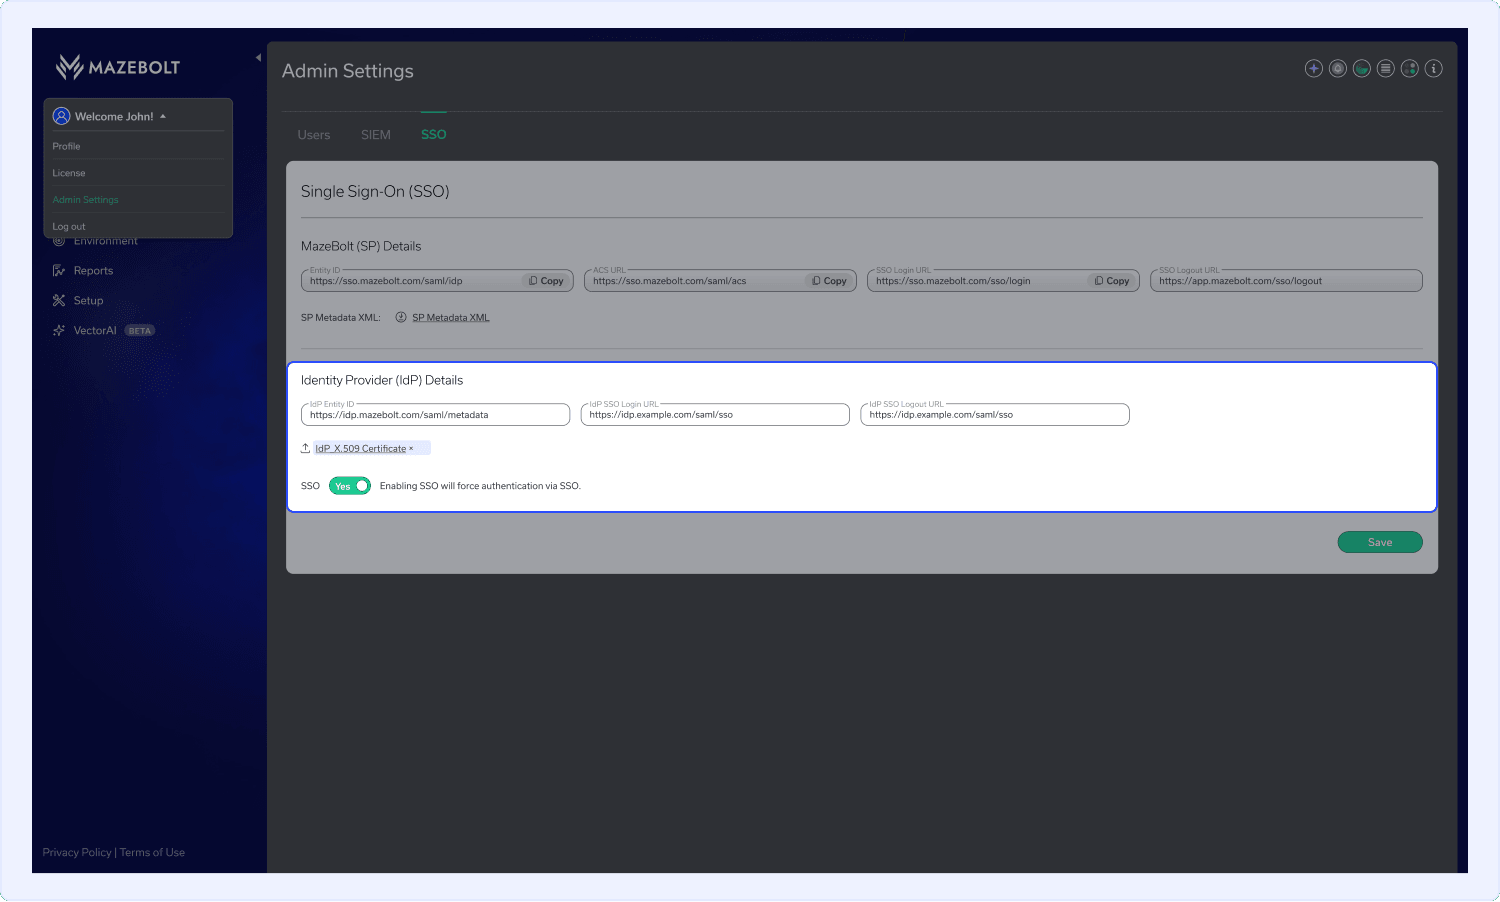
After completing the Okta configuration, return to the SSO tab in RADAR and enter the Identity Provider details obtained from Okta under Identity Provider (IdP) Details:
- IdP Entity ID – Paste the Okta Identifier.
- IdP SSO Login URL – Paste the Okta Login URL.
- IdP SSO Logout URL (optional) – Paste the Logout URL, if configured.
- Upload the Signing Certificate downloaded from Okta.
- Enable SSO Configuration.
- Click Save.
5. Verify the configuration by signing in through Okta.
Important
Monitor the expiration date of the Identity Provider certificate. When the certificate is renewed, upload the updated certificate to RADAR to maintain uninterrupted SSO authentication.